Add Deceased Loved One to Photo Free: What Works (Realistic Guide)
Searching for “add deceased loved one to photo free” usually means one thing: you want a respectful memorial edit that looks natural, without paying upfront or installing complicated software.
That’s possible — but the “free” route works best when you understand two realities:
- Free tools tend to limit quality, exports, or retries.
- The difference between a believable result and a fake-looking one usually comes down to inputs and expectations, not fancy effects.
This guide explains what free options can realistically do, how to avoid the most common “AI look,” and how to get a printable result.
If you want to jump straight to the free tool page, here it is: Add Deceased Loved One to Photo (Free).
If you prefer the full step-by-step workflow first, see: How to Add a Deceased Loved One to a Photo.
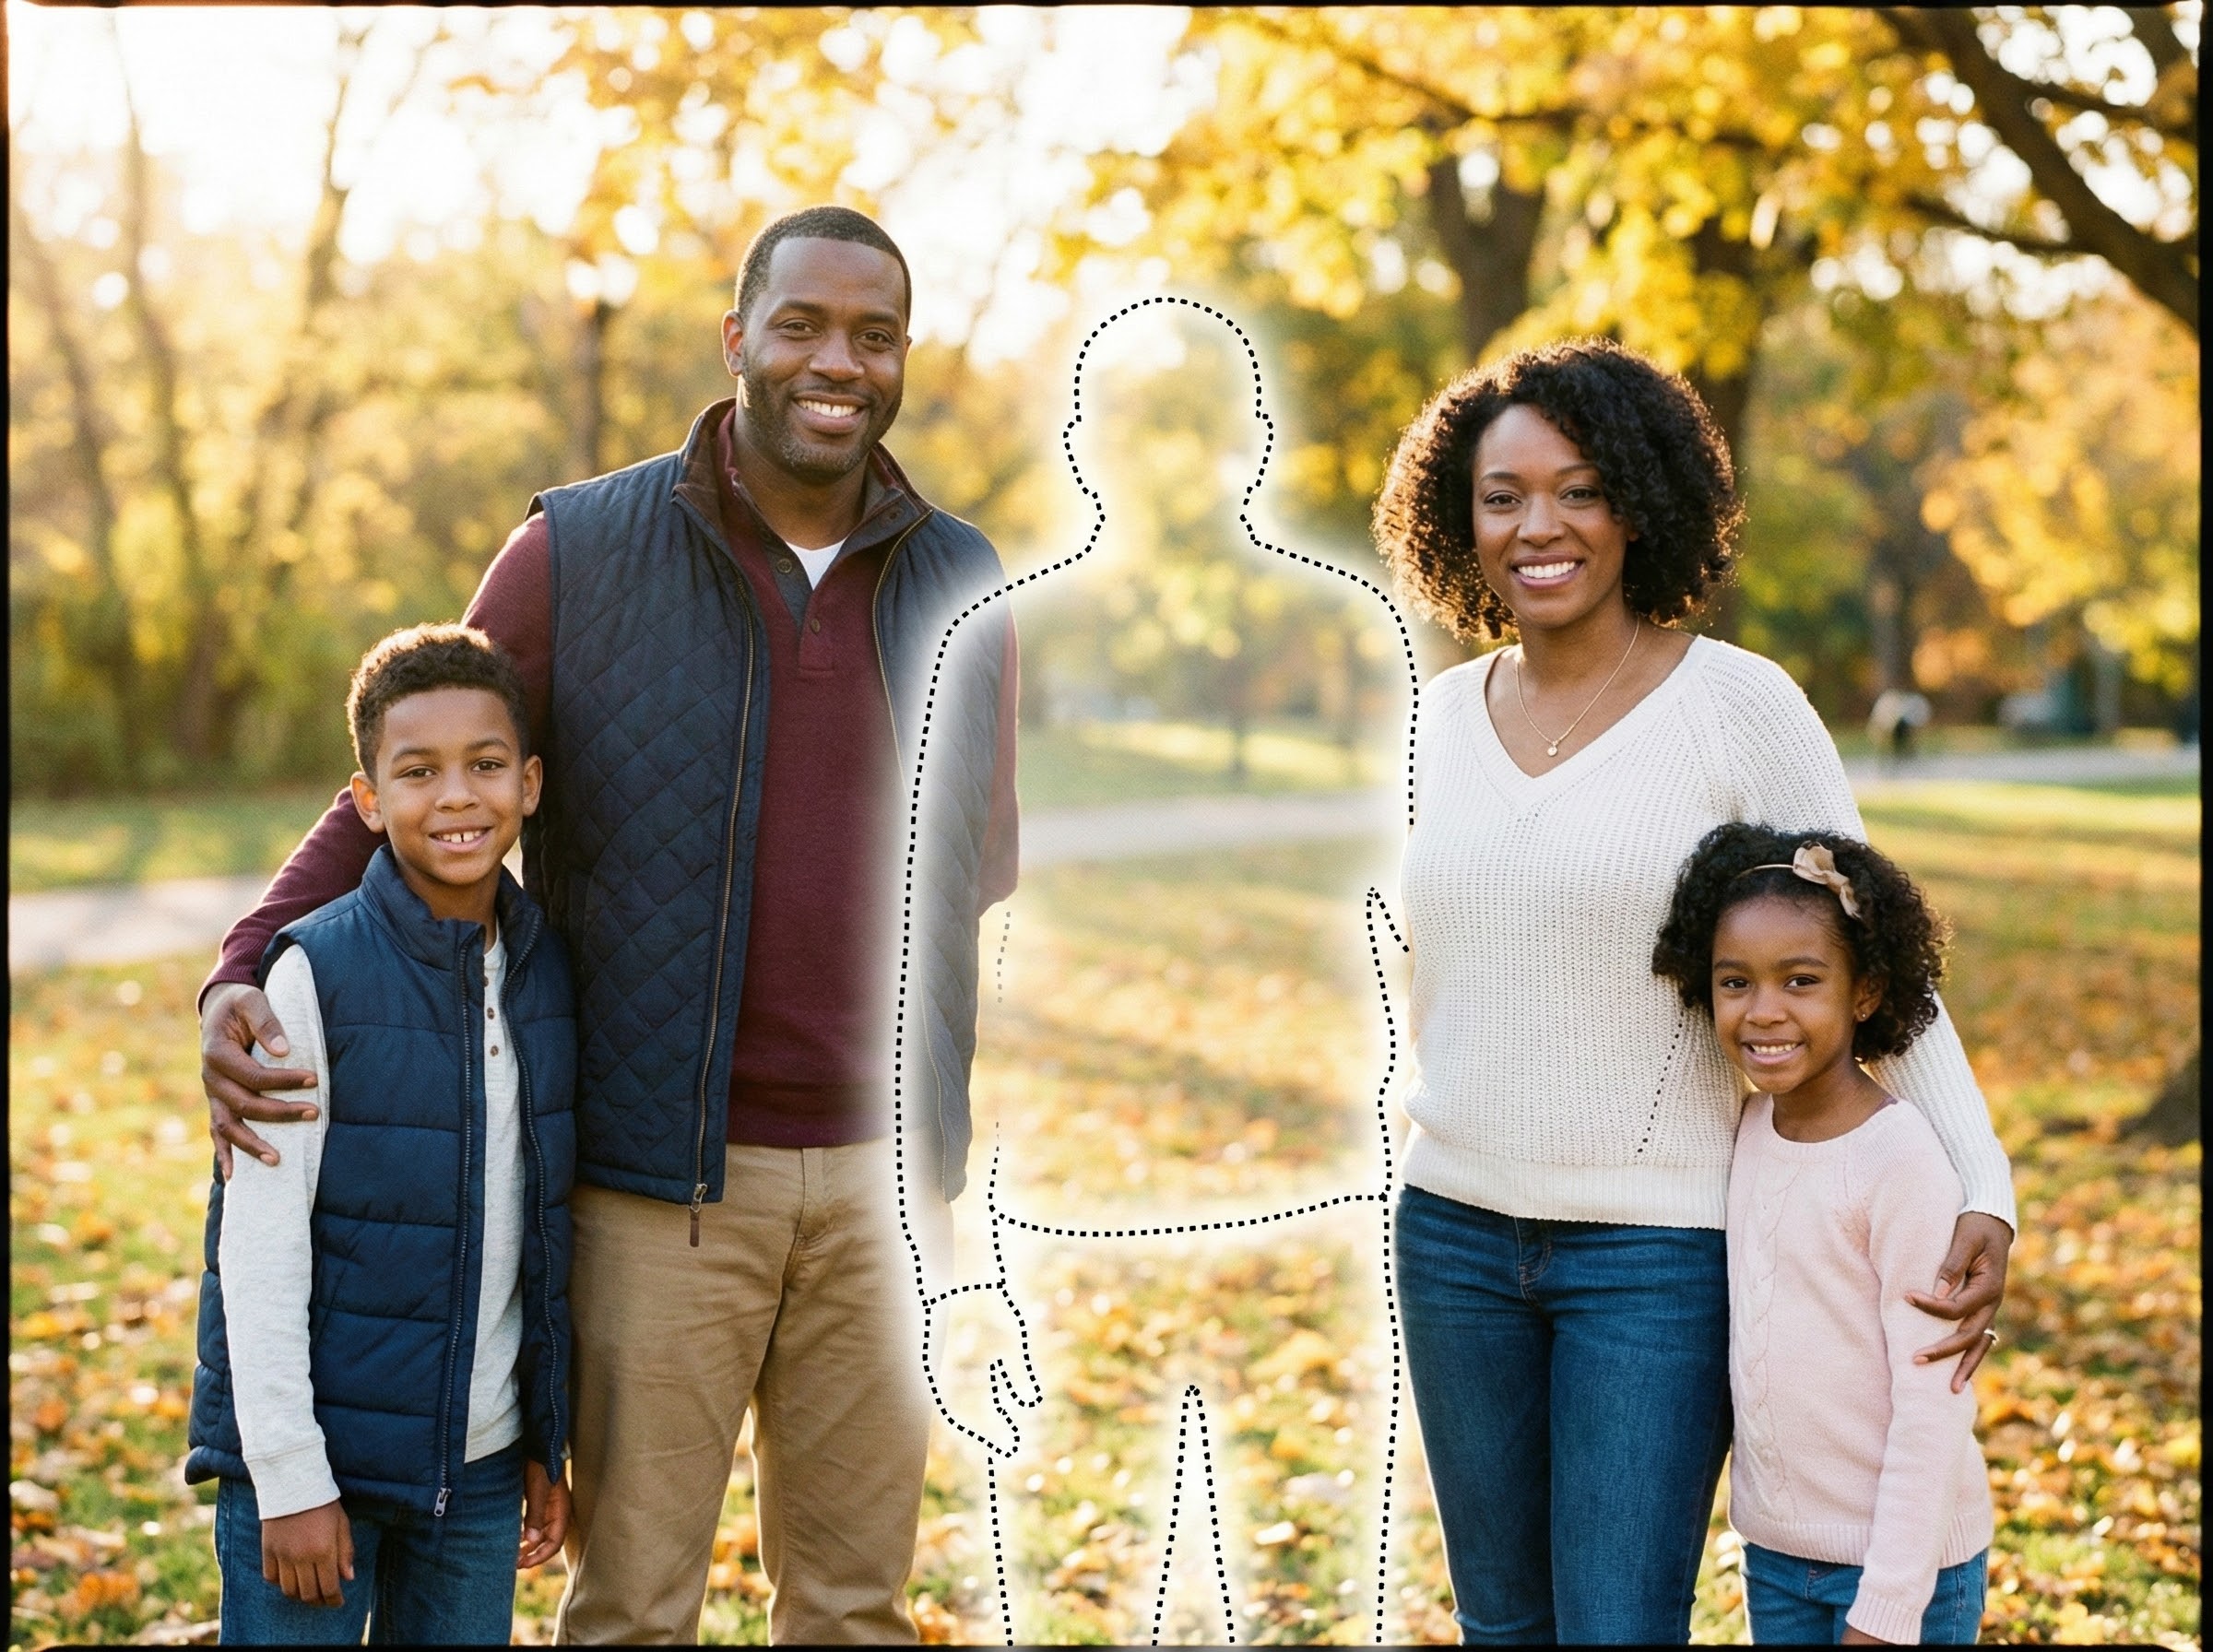
Example (Before / After): Adding Grandpa in the Center
This example shows a common request: adding a loved one (here, grandpa) into the middle of a family group photo. Center placement is powerful emotionally, but it also makes realism more important because everyone’s eyes naturally go to the center.
Before (grandpa not included):
After (grandpa added in the middle):
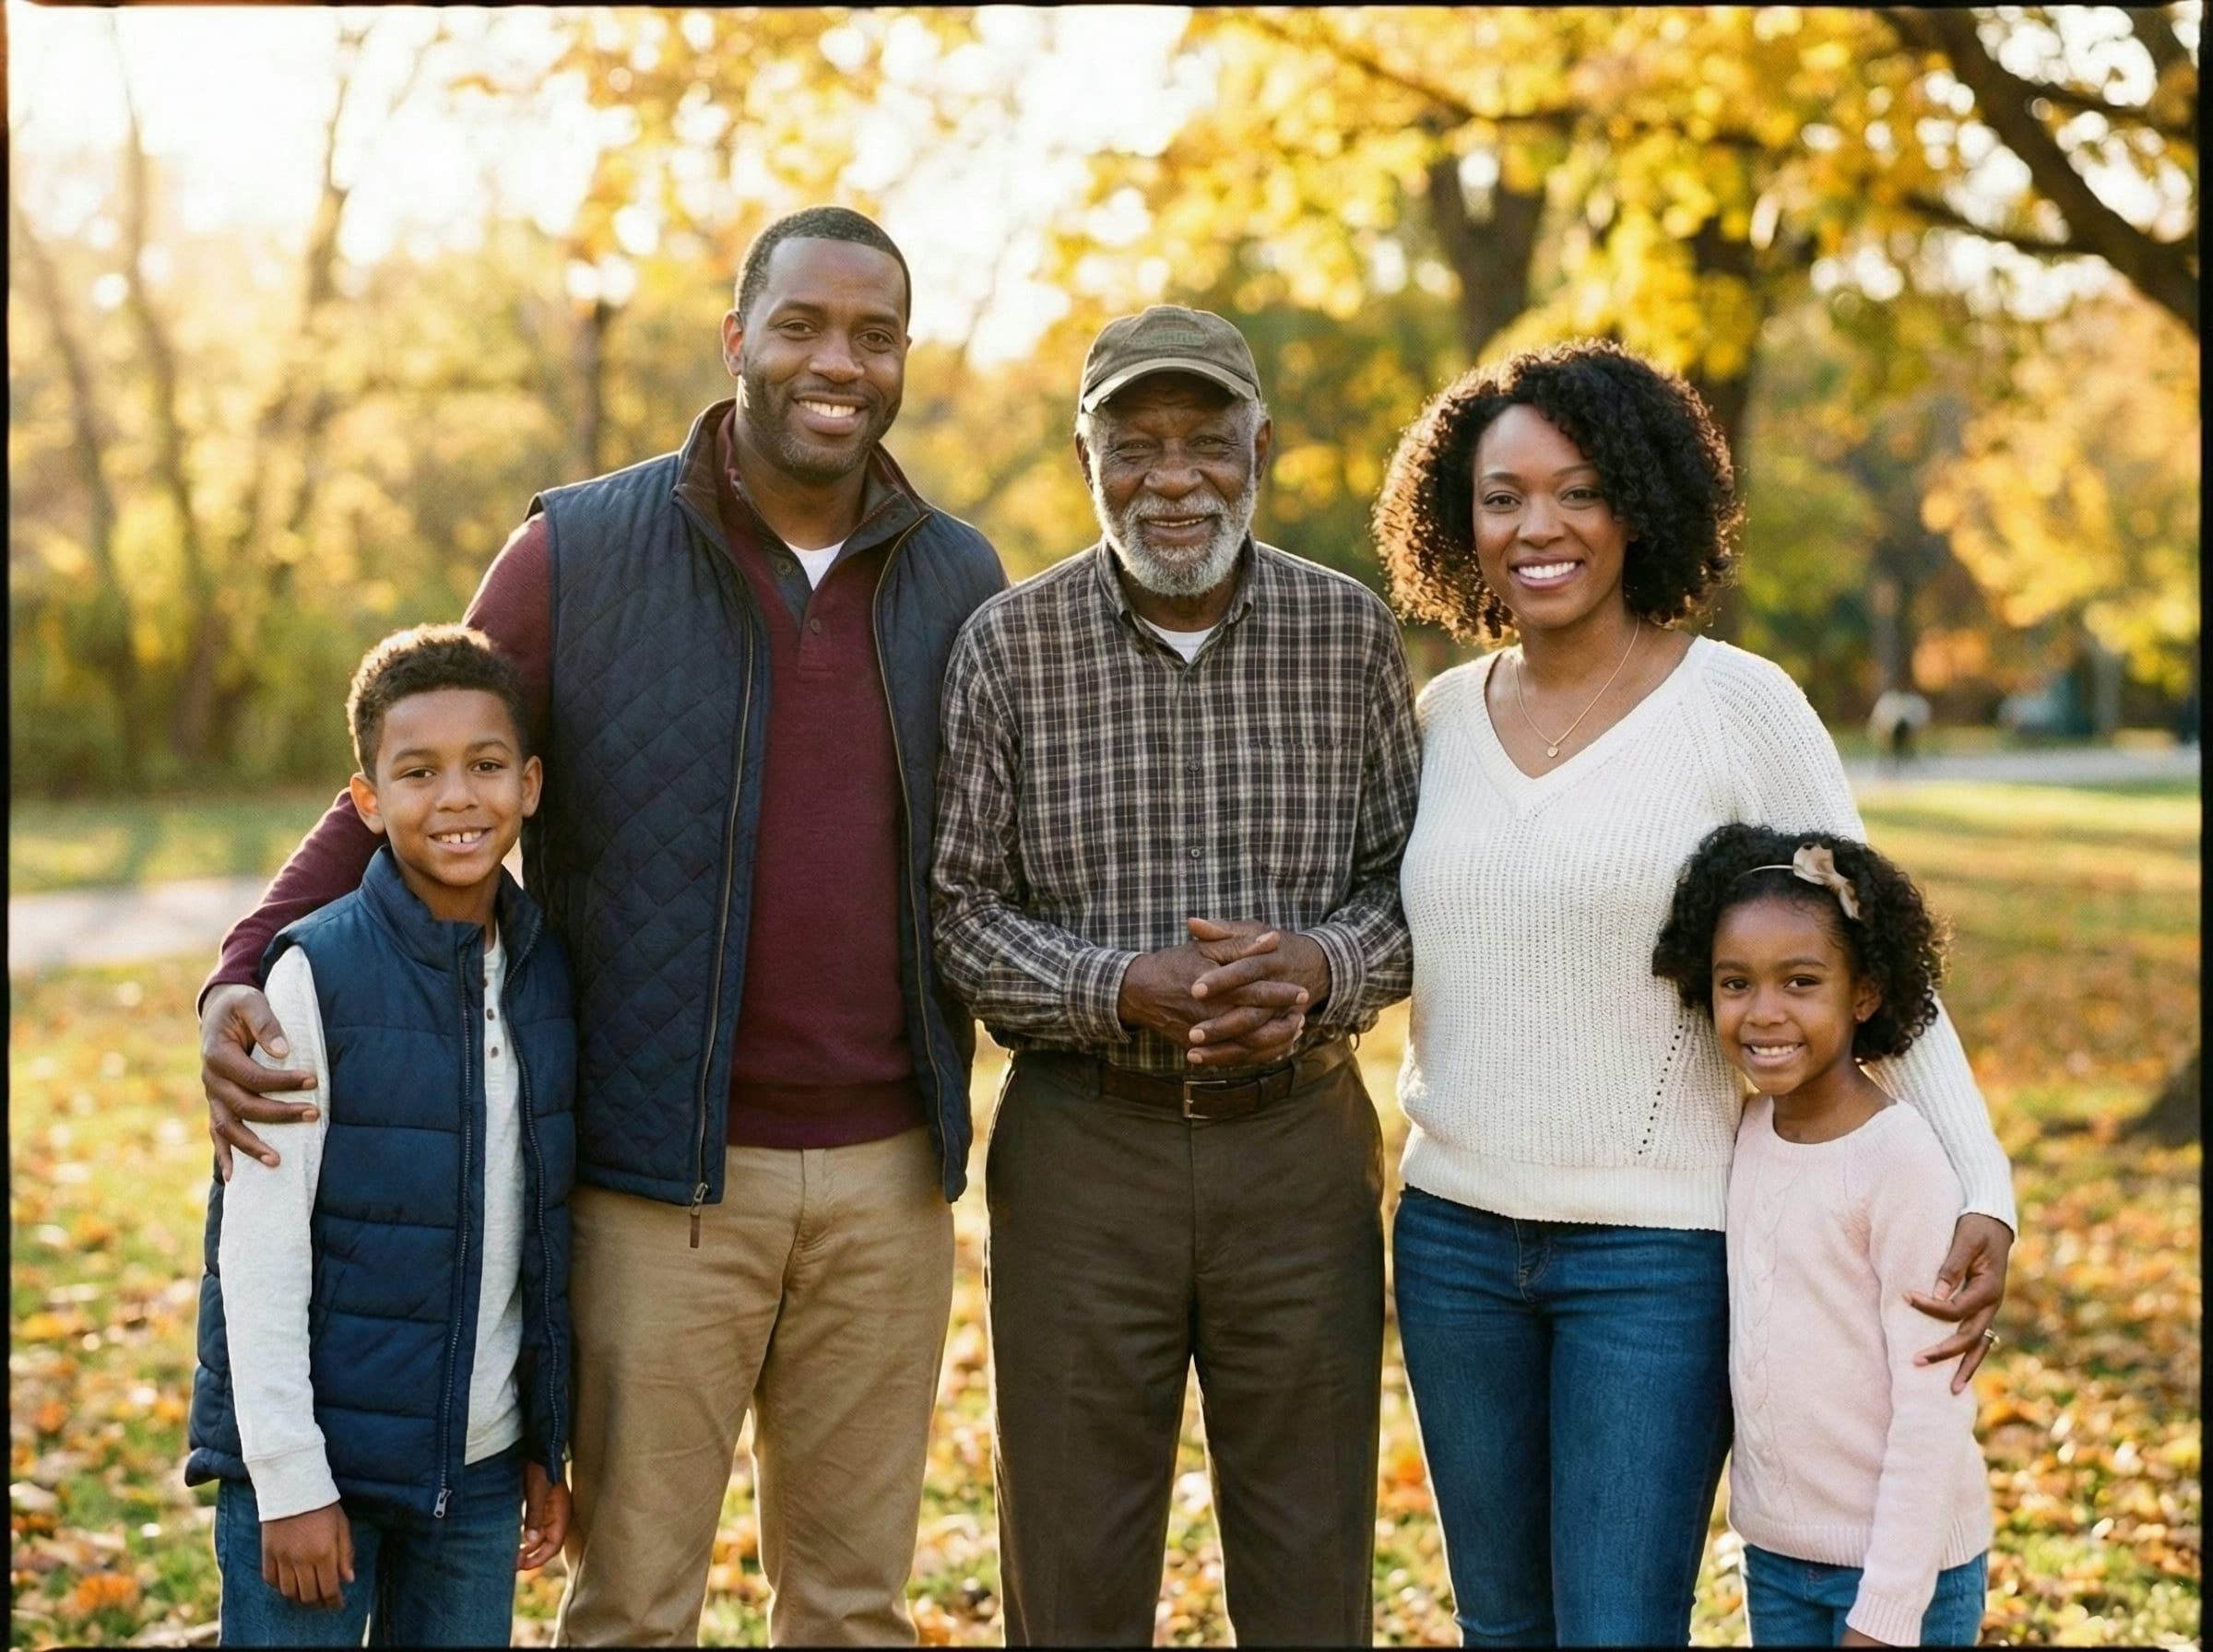
To keep a center placement looking natural, focus on:
- head size matching the nearest faces at the same depth
- consistent lighting direction across everyone
- edge blending around hair/shoulders so it doesn’t look pasted
If you want a reference checklist for what looks natural vs fake, see: AI Memorial Photo Examples.
Can you really add a deceased loved one to a photo for free?
Yes — but “free” usually means one (or more) of these tradeoffs:
- Lower resolution exports (fine for sharing, weaker for printing)
- Watermarks or limited downloads
- Limited retries (you get fewer attempts to refine realism)
- Less control (placement or blending is more automated)
The good news: you can still get a natural memorial photo if you optimize the two things that matter most:
- Source photo quality (lighting, angle, face clarity)
- Realism consistency (scale, lighting match, edge blend, grain match)
What free tools do well (and where they struggle)
Free tools usually do well:
- Simple placement into a group photo
- Basic blending when lighting is similar
- Quick “first draft” results you can refine
Free tools often struggle with:
- Complex hair edges against busy backgrounds
- Strong lighting mismatch (indoor warm vs outdoor cool)
- Hands (extra fingers, warped shapes)
- Heavy occlusion (placing someone behind others realistically)
- Very old / low-resolution face photos
If you already know you’ll need prompts and fine control, use this page too:
Add Deceased Loved One to Photo: AI Prompt Examples.
The easiest free workflow (minimal steps)
This is the most reliable “free-first” approach:
- Pick the best base photo (the family/group photo)
- Pick the best source photo of your loved one
- Do one clean, minimal merge
- Only refine what looks off (scale → lighting → edges → grain)
- Export the highest quality available (then print/share)
You can start here: Add Deceased Loved One to Photo (Free).
Step 1: Choose the base photo (your best “canvas”)
Your base photo should ideally be:
- well-lit (not heavy backlight)
- high resolution (faces are not tiny)
- minimal motion blur
- clear perspective (not extreme wide-angle distortion)
If the base photo is grainy or older, that’s okay — but then your goal is to match that texture (don’t force an “HD face” into a grainy photo).
Step 2: Choose the source photo of your loved one (this matters more than prompts)
A strong source photo has:
- a clear face (not tiny)
- similar angle (front-facing vs side profile matters)
- similar lighting type (indoor vs outdoor)
- natural expression (avoid extreme angles if possible)
Fast rule: if the loved one’s face is much sharper or much softer than faces in the base photo, your final result will look mismatched.
Step 3: The “natural look” settings (what to aim for)
Free tools often default to “enhanced” results. For memorial edits, that’s usually the wrong direction.
Aim for:
- realistic (not cinematic)
- minimal changes
- match the original photo
- keep background unchanged
- no beauty filtering
If your tool lets you add a short prompt, use this:
Add the person from the second photo into the first photo naturally and realistically. Match lighting direction, color temperature, sharpness, and grain. Keep the background and style unchanged. Blend edges around hair and shoulders. No filters, no stylization.
If negative prompts exist, use:
cartoon, illustration, anime, cinematic, glow, HDR, beauty filter, overly smooth skin, extra fingers, halos
Why free results often look fake (and how to fix them fast)
If your free result looks “AI-ish,” the fix is usually small and specific. Don’t keep re-running with bigger prompts — fix the fundamental mismatch.
1) Problem: The person looks pasted on (cutout edges)
What you see
- hard outline around hair/shoulders
- halo around the subject
Fast fix
- match grain/noise
- soften edge blending slightly
Add this prompt line (or re-run with it):
Match grain/noise to the base photo and blend edges naturally around hair and shoulders. Avoid halos.
Also: placing the person slightly behind others helps hide edge boundaries naturally.
2) Problem: Colors don’t match (warm vs cool)
What you see
- face looks too yellow/orange
- skin tone looks greenish compared to others
Fast fix
- match color temperature to the base photo
Add:
Match color temperature and skin tone to the original photo. Avoid orange/green casts.
3) Problem: The face looks too perfect (beauty-filter look)
What you see
- overly smooth skin
- face looks like a different camera or generation
Fast fix
- reduce smoothing
- match texture
Add:
Keep natural skin texture. Avoid smoothing or beauty filters. Match sharpness and grain to the base photo.
4) Problem: Scale feels wrong (head too big)
Scale is the #1 giveaway in memorial edits.
Fast check
Compare the added face to the nearest face at the same depth:
- forehead-to-chin height
- shoulder width
Fix
Add:
Make head size consistent with nearby faces at the same depth. Match perspective.
5) Problem: Hands look strange (extra fingers)
Free tools often struggle here.
Best fix
Use composition:
- choose a source photo where hands are less visible
- avoid poses with fingers spread toward camera
Prompt add-on:
Keep hands natural and avoid distortions. No extra fingers.
A realistic “free” strategy: get a clean draft, then refine once
Most people waste free retries chasing perfection. Instead, aim for this:
- Get a clean draft that nails scale + lighting.
- Do one refinement run to fix edges + grain.
That’s usually enough to reach “believable” quality.
For a realism reference checklist, use:
AI Memorial Photo Examples.
Printing: can a free memorial photo be printable?
Sometimes. It depends on your export.
Good signs (more printable):
- PNG download option
- high resolution output
- faces remain detailed when you zoom in
Warning signs:
- output looks soft or heavily compressed
- watermarks
- limited resolution that becomes pixelated on paper
If you’re adding more than one person, follow:
Add Deceased Loved Ones to Photos (one person at a time is more stable).
FAQ
Is “free AI memorial photo” safe and private?
It depends on the tool’s policy and how it handles uploads. As a general rule, avoid uploading highly sensitive images to tools you don’t trust, and prefer services that clearly explain retention and deletion.
Why do free results look more “AI” than paid results?
Free versions often apply stronger automatic “enhancements” and restrict control. Paid tools typically offer higher resolution exports and better refinement options (or more retries).
What’s the fastest way to improve a free result?
Fix scale first, then match grain/sharpness, then edge blending. If you try to fix edges before scale, you often waste retries.
Should I use prompts for free tools?
Only short prompts. Free tools can overreact to long prompts, creating stylized artifacts. Use minimal, realism-first instructions.
Can I add multiple deceased loved ones for free?
Yes, but add one person at a time and export after each step. That prevents drift and keeps scale consistent. Use:
Add Deceased Loved Ones to Photos.
Related guides
- Add Deceased Loved One to Photo (Free)
- How to Add a Deceased Loved One to a Photo
- Add Deceased Loved One to Photo: AI Prompt Examples
- AI Memorial Photo Examples
- Add Deceased Loved Ones to Photos
- Add Loved One to Photo
Next step (optional)
If you want to try the free workflow now, start here: Add Deceased Loved One to Photo (Free). Upload two photos, use a short realism-first prompt, and evaluate the result using the scale + lighting checklist above before exporting a printable result.